You're reading the documentation for a development version. For the latest released version, please have a look at master.
Train and Export a Model with Jenkins
Requirements
Before beginning to train a deep learning model, you must have or know the following:
Know what type of model you would like to train
Know if you would like to continue training from a previous checkpoint or not
Have a complete dataset in the format identified below
Creating a New Project
Creating a new project is very simple, and only consists of running one pipeline. Navigate to the ‘Create New Project’ pipeline, and press ‘Build with Parameters’ on the left toolbar.

Enter the name of your new project (write it down somewhere, you’ll need this later), and the class labels you used while annotating your dataset. The class labels should be separated on individual lines. Depending on the type of project you’re creating, you may need to use additional labels in the SECONDARY_CLASS_LABELS parameter. For example, if you are creating a keypoint project, please input your keypoint class labels here. Press Build.
After this build is successful, you should see a new folder show up on your Filezilla with the same name. (Hit refresh if you don’t) This is the folder where you will be uploading all data, and receiving the model for everything you do with this project.
Training a Model
No matter the type of model you wish to train, two pipelines are used. For each, you must use the AnnoCheck pipeline first, as you will not be able to run the Training pipeline until the check is successful. This is to ensure that data formatting is accurate and to set up some internal files for the Training pipeline to use.
Classification Models
First, run the AnnoCheck with the following steps:
Navigate to your tkteach folder you used to annotate your dataset in your file explorer
Navigate to the project folder on Filezilla that you wish to use
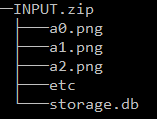
Add all the images in your dataset and the ‘storage.db’ file to an archive (.zip) in the following format

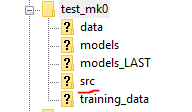
Upload the .zip file to the ‘src’ folder on Filezilla

Navigate to the Classification-AnnoCheck pipeline on Jenkins
Click ‘Build with Parameters’ and select the name of your project, as well as your DATASET_ID (stored in storage.db). If you deleted storage.db when recommended earlier, your DATASET_ID should be 1. Else, use an SQLite DB tool to find your DATASET_ID
Click ‘Build’
Please ensure the previous build is successful before carrying on to the next step. If the annotation check failed, please check the following before contacting DaoAI for help:
Your data is formatted correctly
Your class labels are correct (in the annotations AND in Jenkins)
Next, run the Training with the following steps:
Navigate to the Classification-Training pipeline on Jenkins
Click ‘Build with Parameters’ and select the details for your project
If you wish to train from a previous build, select the build from the dropdown menu titled ‘CHECKPOINT’
Click ‘Build’
Now the model is training and you can continue to the Exporting a Model section.
Segmentation Models
First, run the AnnoCheck with the following steps:
Navigate to your dataset that you annotated containing the PNGs and the JSONs
Navigate to the project folder on Filezilla that you wish to use
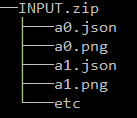
Add all the images and JSONs to an archive (.zip) in the following format

Upload the .zip file to the ‘src’ folder on Filezilla

Navigate to the Segmentation-AnnoCheck pipeline on Jenkins
Click ‘Build with Parameters’ and select the name of your project
Click ‘Build’
Please ensure the previous build is successful before carrying on to the next step. If the annotation check failed, please check the following before contacting DaoAI for help:
Your data is formatted correctly
Your class labels are correct (in the annotations AND in Jenkins)
Next, run the Training with the following steps:
Navigate to the Segmentation-Training pipeline on Jenkins
Click ‘Build with Parameters’ and enter the details for your project
If you wish to train from a previous build, select the build from the dropdown menu titled ‘CHECKPOINT’
Click ‘Build’
Now the model is training and you can continue to the Exporting a Model section.
Training from a Previous checkpoint
If you wish to continue training with new data, using a model you had previously trained to save time, you can do so. All of your exported models should come named with a build number To improve an old model, simply input the build number as a parameter for the training pipeline.
As we have limited storage, only a certain number of past builds are stored for each project, usually the last 10 builds, or any builds in the last week (whichever number is higher)
Exporting a Model
If a model training reaches a certain training level (dependent on the accuracy and loss) or it has trained for what is typically a sufficient amount of time, it will automatically complete the training and export the model. Otherwise, if you are satisfied with the training of your model and wish to stop it early, simply cancel the build of the Training pipeline. When the build is cancelled, it will automatically export the model.
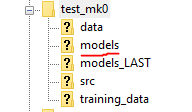
Once your model has been exported, you will be able to find the CPU version, the GPU version, and the input config file for your model in the ‘models’ folder of your FTP project.

If you accidentally run the build again before getting your models, don’t worry! The previous model export is also saved in the ‘models_LAST’ folder for your convenience.